Using your photo editing software for painting
is yet another way to add style and dimension to your digital
projects, and is easier than you might think. You can paint on
just about anything from background papers and elements to rubber
stamped images that are scanned in. Being a rubber stamp
enthusiast, I wanted to find a way to incorporate my rubber
stamping into my personal digital layouts. Using Paint Shop Pro to
paint the stamped image allows you to get the exact color you want
by using your eye dropper tool.
Many digital elements are perfect for adding
paint effects to get that perfect touch. Our newest CD,
Simply Moments, has tons of fun
doodles and stamps just waiting to have your own touch of color
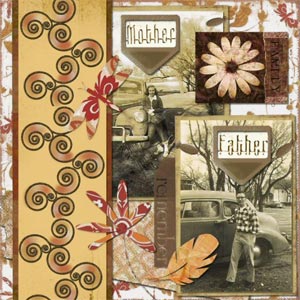
added. In my first sample layout, I painted beneath two different
butterfly stamps from Simply Moments and on the second sample, the
swirled stems, to add
more color to this section of the layout.
Another idea is to give the look of white paint
underneath text to make the journaling stand out, as Michelle did
here. Highlighting can also be
done on memorabilia, like scanned in newspaper articles that you
might want to add to your layouts, but donít want to ruin by
highlighting traditionally.
The key to painting using your software is to
play around with opacity or layer blend modes and the various
brushes. My favorite brush is the chalk brush in Paint Shop Pro,
as it adds a very soft accent. The opacity setting entirely
depends on what effect you want on your layout. Is it a layout
that requires bright, vibrant color or soft, chalky color? Are
there fine lines that you donít want covered or bold black lines
that can be filled in with color? The more you play with your
brushes, the more comfortable you will become and before you know
it, you will be a digital painting master!
Steps to get Started:
1. Open your image editor, which supports layers and brushwork.
2. Choose your background paper and elements to create a digital
layout/piece.
3. Put your layout together digitally before painting, so you
will know which layer to add the paint beneath or above.
4. Create a new layer to paint on (click Layer >New Layer)
5. Click on your foreground color box and use your eye dropper
tool on your background paper to choose the exact color paint
you want.
6. Select the brush tool and choose a custom brush you created
or a standard brush that best suits your desired paint treatment. I like the
Chalk brush.
7. Set the brush size to your preference.
8. Using your mouse or Pen tablet, paint with short or long
strokes, until desired effect is reached. Layer on top of other
strokes, as desired. Create new paint layers, if needed,
especially if using more than one color, so you can adjust each
color individually.
9. Adjust the paint layer's opacity to your desired effect. OR,
change the paint layer's blend mode to Overlay, Soft Light,
Multiply, or other variations to see the interesting results.
10. Use the Eraser Tool with any brush to removed unwanted
paint, too!
Beth Ervin, CottageArts.net
|

Created with papers, elements, butterfly stamp, and
butterfly word art from our
Simply Moments CD, mother/daughter poem
from Thena Smith on our
Simply Stated CD, paper clip from
Springtime Blossoms Page Pak download,
and large daisy from
Dipsy Daisy Page Pak download.
Image Editor: Corel Paint Shop Pro

Created with papers and elements from our
Simply Moments CD.
Mother and Father metal words from
Our Family Page Pak download.
Image Editor: Corel Paint Shop Pro
|