|
Becoming a digital photo tech!
I've been a digital camera user for almost three years and I learn
something new every time I use it. The leap
from film to digital was daunting, but exciting, as my photography was
taken to a whole new level. Now I can experiment with various
camera settings in
different situations, without worrying about wasting film, or the cost
of developing bad photos.
|
The best advice I can give a digital camera owner
is "read the instruction manual"! Most of us tend to
refer to the instruction manual to learn about the basics, such as
setting the timer, or installing and charging the batteries, but
then never look to it again for guidance. Your camera manual
holds a lot of great information about ISO speed, exposure (aperture
and shutter speed), macro settings, flash management, and how to use
special effects such as solarize, sepia, burst shooting (multiple
shots when shutter button is pushed), etc. I keep my manual inside my camera
bag for easy reference, and believe me, I refer to it continuously.
|

Photo credit: Michelle Shefveland |
The best advice I can give a digital camera owner
is "read the instruction manual"! Most of us tend to
refer to the instruction manual to learn about the basics, such as
setting the timer, or installing and charging the batteries, but
then never look to it again for guidance. Your camera manual
holds a lot of great information about ISO speed, exposure (aperture
and shutter speed), macro settings, flash management, and how to use
special effects such as solarize, sepia, burst shooting (multiple
shots when shutter button is pushed), etc. I keep my manual inside my camera
bag for easy reference, and believe me, I refer to it continuously.
Secondly, take time to learn to use your camera. It was a slow
progression for me - I began in full auto-mode, and only when I
became comfortable with the feel of the camera, did I begin
to experiment with different features and settings. You will only
use up space on the memory card, and it's easy to delete the
not-so-good shots as you go.
Another key to outstanding digital photographs
is understanding your photo-editing software. The steps taken after
the images have been uploaded to your computer are just as important
as the photographs themselves, and can be the difference
between a good and bad result. Some software packages demand a
steep learning curve to master even the basics, but there are plenty
of books (see Michelle's book,
Scrapbooking the Digital Way, for a
full chapter on photo editing techniques), courses, and even on-line tutorials to help you out (check
out our Photoshop Elements photo-editing tutorials here).
Our
Scrapper's Guide Volume 2 CD - Fabulous Photos,
teaches you oodles of editing tips and artistic effects for
Photoshop and Photoshop Elements. You
won't believe what can be created once you begin to feel comfortable
with the software!
For those who really want to improve their
photography skills, consider taking an on-line course, or one at
your local college. You'll be challenged to grow by your
instructor's and fellow students' critiques of your images. Some
great courses are offered at
www.betterphoto.com. An image that looks good through your camera lens
can be transformed into something even better with a little
photo-editing knowledge. Make sure you first learn the basics
of how to re-size, crop
and make color adjustments - the results will be well worth it!
See below for my before and after photo clean-up and Michelle's
photo tinting technique.
Beth Ervin of
CottageArts.net
|
|
Before clean-up:

After clean-up:

|
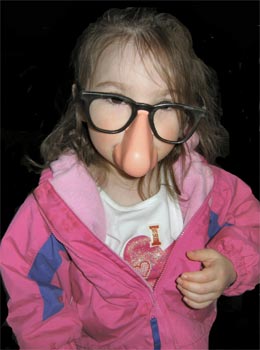
This photo of my niece, Samantha, is
an adorable candid shot, but since time was of the essence, I
certainly couldn't set up a perfect shot! There are a few small flaws that I easily cleaned up
with my photo-editing software, Paint Shop Pro 8. These "fixes"
help focus in on Sam.
1. Problem - distracting background
Solution - Paint the background
black around subject.
Choose the circle brush
Change the background color to black
Paint on a new layer to avoid affecting the original image. Choose 100% opacity for large
outside edges; 50% opacity as you get closer to the subject edges to
avoid sharp contrast.
2. Problem - photo too dark
Solution - lighten photo
3.
Problem -
plastic glasses cracked
Solution - use clone tool to remove crack
- Choose the clone tool from the tool bar
Right click on clean area of lens and then mouse over to crack
and click with mouse
Repeat until crack removed
4.
Problem - composition a bit off
Solution - crop photo to zoom in on subject
- Choose the crop tool from the tool bar
- Drag the crop bar around the photo until you have the preferred
crop
- Double-click your mouse and the photo will be cropped to your
specifications. FYI: depending on digital image size, you can
normally make small crops without losing too much quality.
|
|

Photo credit: Michelle Shefveland
|
Using Adobe Photoshop Elements 3, I love creating a soft tinted
effect with the following steps (other image editors would follow
similar steps):
- Duplicate photo layer (Choose Layer>Duplicate)
- Convert top layer to Black and White (various methods to do
this...1)Enhance>Adjust Color>Remove Color; 2)Enhance>Adjust
Color>Adjust Hue/Saturation (move Saturation slider to left
edge);3)create black/white Gradient Map Adjustment Layer (Layer>New
Adjustment Layer>Gradient Map-foreground black/background white)
- Using Levels (Enhance>Adjust Lighting>Levels), increase contrast
of this black and white layer, if necessary
- Decrease opacity of this new black and white layer (or Gradient
Map Adjustment Layer) to your tastes. For these, I set it at
about 70%.
- Using soft round brush shape and eraser tool set at 10% opacity,
softly erase cheeks and eyes until a little more color appears.
- This is a fun technique to play with!
Enjoy!
Michelle

|
|
|