|
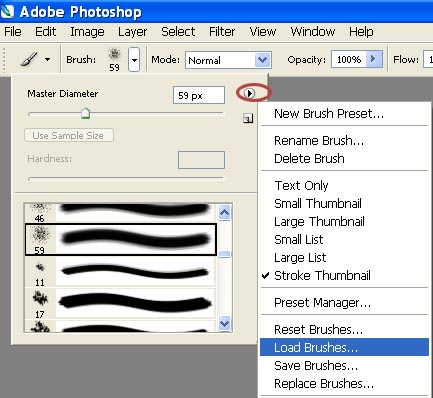
Save in one of these image editor's brush presets folder (C:\program files\Adobe\....). The brush tool is found on the toolbar at left, and looks like a paintbrush. The keyboard shortcut to select this tool is to type "b". Once you have the tool selected, the Options Bar (typically toward the top of the screen) should change to show the options that are available when using the brush.
.

When you
click on the right arrow at the
top of the Brush Options Box, a
fly out will appear. In the list
is a selection called Load
Brushes. Click on this and
select the brush set from where
you have it saved on your
computer. It will then ask if
you want to replace your current
brushes or append to your
brushes. If you choose Replace,
be sure to save your current brushes if not saved yet.
Once you
have your brush set loaded, the
fun begins! You can see a small
thumbnail view of the brushes
from which to choose. First select the brush of your choice,
choose the color you will want
your brush image to be, adjust the size of the brush, create a new layer, and then using your mouse click on your layout where you'd like the "stamp" to appear. You can then adjust the layer blend mode of this brush, erase portions, etc. to customize the look.
You can use
your "stamped" brush image as an
accent or as an allover pattern
on your background. Below are
some layouts that use brushes.
Have fun with the brushes
contained in this month's
featured kit.
Also try the free sample set of
Flourish Brushes which were
created by Michelle Shefveland
for her article on digital brushwork in
Legacy's April/May 2006
issue. Read
the article for instructions on how
to install brushes and how to
create a flourish edge frame and
brushwork collage using the
free brushes. |


