
|
|
Torn Paper Technique for
Microsoft® Digital Image Pro

A good torn edge really makes a digital layout appear hand-made, and the following tutorial shows just one possible version. You can have fun experimenting to come up with one that suits your style best.
We’ll give step-by-step instructions using Microsoft® Digital Image Pro 7 (DIP) for this lesson. Adobe® Photoshop® and Elements®, Jasc® Paint Shop™ Pro® 7 and higher, and Ulead® PhotoImpact 7 and higher would follow similar steps, but with different commands.
Once you have your background complete with a torn edge, you can complete your custom layout. See our tutorial on using Background Papers with DIP to help with the remaining steps.
Supplies used:
-
Microsoft® Digital Image Pro 7 (DIP)
-
Canvas Sage and Elegant Stripes 8.5x11 Background papers from Simply Elegant CD
Open the Papers in DIP
1. Open Microsoft® Picture It!® Digital Image Pro 7
2. Insert Simply Elegant CD in CD drive.
3. Choose File > Open and browse to your CD drive.
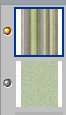
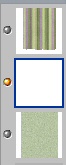
4. Select 8.5 x 11 Backgrounds folder. Press the Ctrl key and choose Canvas Sage.jpg and Elegant Stripes.jpg files. Click OPEN. Both papers will appear in window as thumbnails at bottom of screen. Elegant Stripes is the active file.
5. Click the Canvas Sage thumbnail to make it the active paper, as that will be the bottom paper layer in this example.
6. Click the Elegant Stripes thumbnail and drag to active window to layer on top of Sage paper. Drag the Striped paper until it completely covers the Sage paper. The layer palette will show both papers, even though you’ll only see the Striped paper (the Sage is beneath it):
Save File
7. Choose File > Save as and enter file name, choosing Save as type: Picture It! PNG Plus in order to retain all the individual layers. From this point on, save often in the design process by choosing File > Save.

Tear the Edge
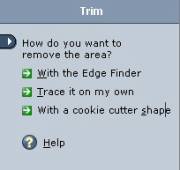
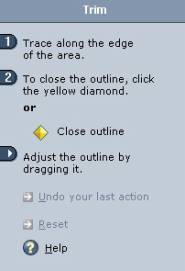
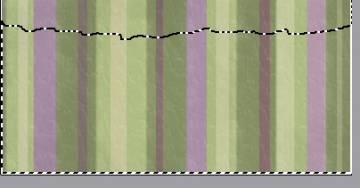
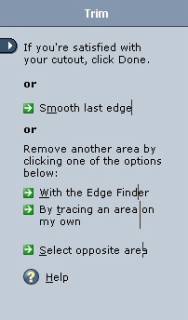
8. Choose Format > Trim. In first option Choose ‘Trace it on my own’ and follow directions in second window by drawing an outline for the area to “Trim” away from the Striped paper from the lower third portion. Enclose the area completely by ending at the yellow diamond. You can adjust it as explained, and click Done when satisfied.
![]()
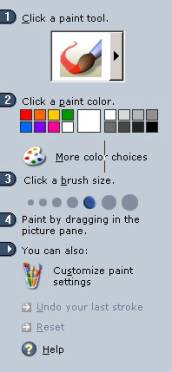
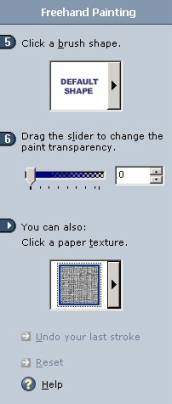
9. Now the fun part comes in to make this edge look really torn. One fun technique is to paint an edge with a textured paint brush. Choose Effects > PaintBrush > Freehand. For this example we used the following settings:
- Paint Tool: Paint Brush
- Color: White
- Brush Size: Third Largest
- Brush Shape: Default
- Opacity: 100%
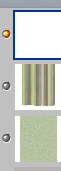
- Texture: Canvas
10. Draw a messy stroke across the page that overlaps the torn edge. Don’t worry that it is on top of the paper, as we’ll move it below.

11. In the layer palette, move the paint stroke layer below the Striped paper layer by clicking and dragging (See before and after below). Adjust it so it appears like a small torn edge and is appealing to you.
Add a Drop Shadow to the Torn Edge
12. Click the White layer in the layer palette (paint brush layer as shown above) to make it the active layer to apply the shadow to.
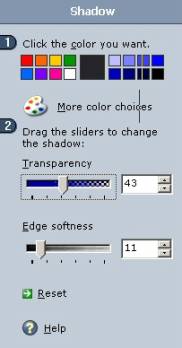
13. Choose Effects>Shadow. In this sample, we used Drop Down Right, clicked Customize the shadow and used the settings below. We then dragged the shadow to be just barely exposed, which mimics a small, realistic shadow effect.

That’s all there is to it! But, again, there are so many options that you can play with to see which you like best! Try different paint colors, textures, brush types and widths, and you’ll be amazed at the variations you can achieve.
Michelle Shefveland, Copyright 2004, CottageArts.net, LLC, All Rights Reserved