|
Traditional Paper Scrapbooking in
just Minutes using our products!
This is the third article in a series by Beth Ervin, paper
artist and design team member, to show us how we can create
simply gorgeous pages in just minutes. This month we add a few
more techniques, while still keeping it quick! See
the first article here and
the
second article here.
This month, we have stepped up the
layout format a bit for those of you who want a bit more challenge.
There is a definite art to creating collage, just as there is to
poetic journaling. The shapes and forms of the papers you
choose add to the scrapbook page design, and, working with other
elements, pull together a distinct look and feel uniquely your own.
Collage pages convey the story of your photos in a whole new light
and also say so much about the artist.
By stretching your imagination and
opening your eyes to all types of new "ephemera" (scraps that others
may call junk), you can customize your pages and reach out beyond
the average scrapbooking realm. You will want to support your
page theme by adding elements that match, not only in color, but in
the message you want to convey with your photos.
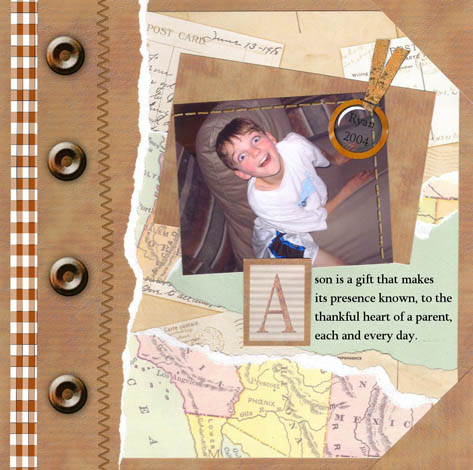
For my sample layout, I wanted to convey
a feeling of wanderlust; thus, the postcards and maps are a starting
point. Next you will want to think about what form of writing
you want to include. Do you want this to be personal
journaling or will a poem or simple quote suffice to convey your
message? Pulling these ideas together in a unified fashion
without the page becoming too busy is the key to collage. It
may take some additional time to get your papers torn just right,
but this is the fun part! Once you have explored collage, you
are well on your way to creating backgrounds for altered pages that
exhibit texture, depth, and style.
For the sample layout, I chose papers
from these CDs: Simply Vacations, Simply Elegant, and Simply
Vintage. I also used the following download elements: Buckle
Page Pak paper, Thanks AlphaSet, and Pumpkin Page Pak ribbon/watch
crystal. I chose to use digital stitching from Made in America
Page Pak and Summer Vacations Page Pak, but machine stitching will
also work. To create a similar layout, follow these simple
instructions.
-
STEP ONE
-
Print two pieces of 12x12 background
paper. The rest of your papers will be 8 1/2x11, print one
of each of the papers you chose.
-
-
STEP TWO
-
Tear four pieces of your 8 1/2x11
papers. Adhere the papers in a collage onto the 8 1/2x11
background piece, making sure to leave enough room for your
journaling. Adhere this to your 12x12 background piece.
-
-
STEP THREE
-
From your second 12x12 piece, tear a
strip and adhere it over the left side of the layout. Attach
rivets or buttons either digitally or traditionally. Tear or
cut two corners to fit over the right side of your layout at both
top and bottom. Cut a background mat for your photo from the
same 12x12 piece.
-
-
STEP FOUR
-
Adhere your mat and photo at an angle
over your collage. Scan your layout to add digital elements
and re-print or post to the web, or add your journaling and lumpy
elements traditionally.
Beth Ervin, CottageArts.net
|


