
|
Creating a Chalked Effect using Jasc® Paint Shop™ Pro® 8
|
Creating a chalked text effect in Paint Shop Pro 8 is relatively simple and produces a fun end result. In the following tutorial, I’ll show you one way to achieve this effect:
The tools we will use in this tutorial are:
-
Dropper tool
-
Paint brush tool
-
Text tool
-
Selections: Invert and Feather
-
3D effects: Shadow
-
Background Paper from Simply Sampler CD: "Leaves"
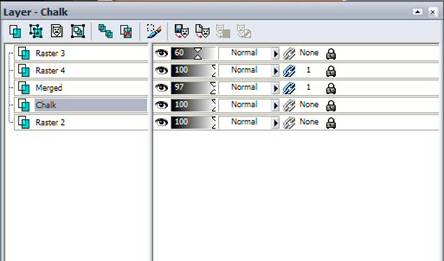
- Create a new layout by opening "Leaves" background paper from Simply Sampler CD within Jasc Paint Shop Pro 8. Customize to your taste by adding photos and embellishments. See our other tutorials for help on creating layouts from scratch. To create the chalk effect for the title, first create a new raster layer (Layers / New Raster Layer) on your layout, and rename it chalk .
- Using your dropper tool
 ,
select at least two colors from your layout for your chalk colors. (I
alternated between the following four colors: #CB7B41 #F0D9C8 #774521
#E3B797)
,
select at least two colors from your layout for your chalk colors. (I
alternated between the following four colors: #CB7B41 #F0D9C8 #774521
#E3B797)
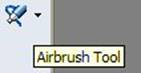
- Select your paint tool
(I like the airbrush for this effect)
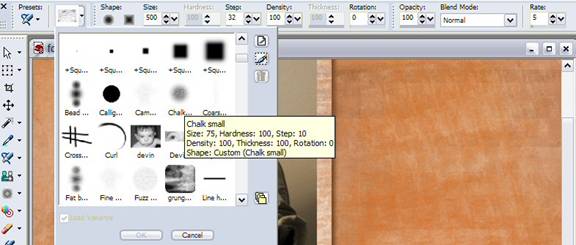
- On your tool palette
options, select a custom brush with which you will create the chalk.
“Small Chalk” and “Fuzz Small” work well for this, though any brush you
choose is great!
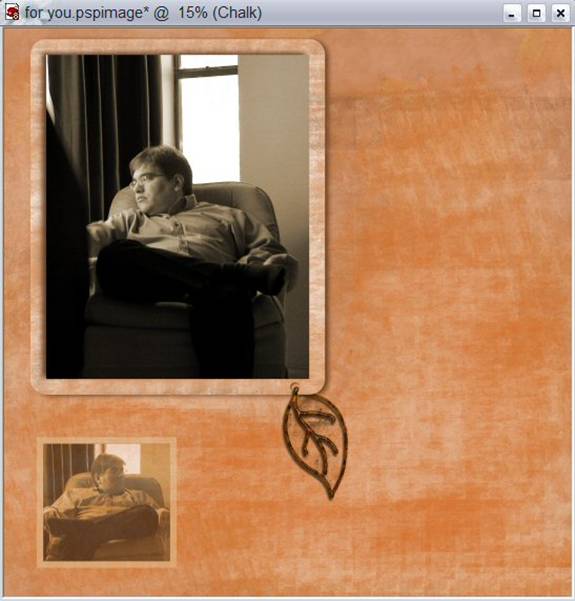
- Fill your chalk layer with the
colors you’ve chosen for the chalk. You’ll need to switch between
foreground and background a few times. For more realism, play around
with the size, density and rotation of the custom brushes as well.
Mine looks like this at this point:
- Once the layer is filled
to your satisfaction (keep in mind that it doesn’t need to be perfect!),
select your text tool
 as Floating type
text ("Create as: Floating" from the Tool Options palette), as well as the font of your choice. The actual colors used for the font
don’t matter here, just make sure you can see it on the chalk layer for
placement. For this tutorial, I’ve used a font called Joplin.
as Floating type
text ("Create as: Floating" from the Tool Options palette), as well as the font of your choice. The actual colors used for the font
don’t matter here, just make sure you can see it on the chalk layer for
placement. For this tutorial, I’ve used a font called Joplin.
- Position your text over
the chalked area. After your text is typed
in, go to your layer palette, right click on your Floating Selection and
delete it.
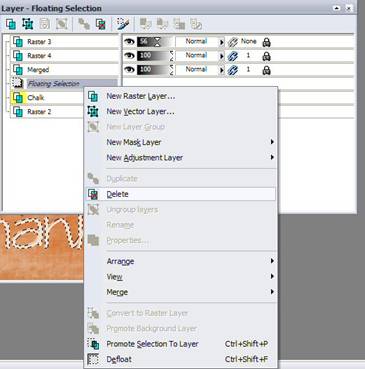
- Now go to Selections and
click invert.
- Click the scissor icon
 ,
or go to Edit, Cut. Once this is done, all you are left with is your
text, filled with the “chalk”
,
or go to Edit, Cut. Once this is done, all you are left with is your
text, filled with the “chalk”
- Go back up to
Selections, invert again.
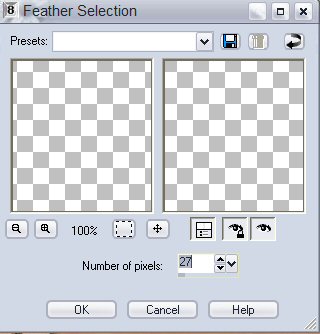
- After you’ve done this,
go back into the Selections menu, click Modify, and Feather. The amount
of Feather truly depends on your taste, as well as the size of your
text/layout/dpi. I used the following Feather settings:
- Choose your brush
again, and add a bit more to the selection. Again, play with the size,
density and rotation for added realism.
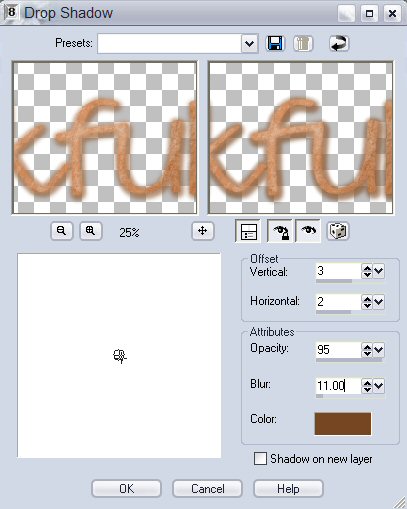
- Go to Effects, click on
3D Effects, Drop Shadow. I used the following settings, and a shadow color
of #764622 :
- Go to selections again,
click on <Select None>.
- Add the same drop shadow, and you’re done!

Leila
Written by Leila Schweiss, Copyright 2003 CottageArts.net, All Rights Reserved.