|
Creating Realistic Drop Shadows
with Adobe® Photoshop® and Photoshop Elements
(Revised: 07/14/2012 - Paint Shop Pro would follow similar
steps)
Tips for Creating Realistic
Drop Shadows
Most of our
digital elements and AlphaSets come
without drop shadows so you can
customize them to meet your needs.
However, in a majority of kits we
include some elements with realistic
lifted shadows for a fun twist and to
save you time. When space allows, we
offer both an un-shadowed and shadowed
version. In these cases we add the word
Shadow to the shadowed version.
To become
familiar with how light and shadows
work, look
at real life shadows and layer objects
on top of each other to see how the
shadows are affected.
A good rule
of thumb is to keep the direction of the
shadow the same on all elements on a
page as light normally comes from one
direction. We
have been consistently using 120 degrees
(light source coming from top left) for
any shadows we create for our elements.
Anything
hanging over the edge of an object with
a shadow needs an even deeper shadow, as
it is even higher off the page. See
postcard at right.
Shadows get
lighter and blurrier the further away
they are from the source.
All image
editors that support layers offer a
quick and easy drop shadow effect. These
work well for most flat objects with
uniform shadows. However, adding your
own shadow on a separate layer allows
the ability to get very creative and
give the illusion of objects lifted away
from the page.
Our
Creative Shadows and
Fab Frames Actions (shown at
right) create a separate layered
shadow you can play with yourself as a
starting point. The actions work with
Adobe Photoshop CS and above (not PSE).
Below I
share steps to create drop shadows
with layer styles in Adobe Photoshop
CS and Photoshop
Elements, plus custom lifted drop
shadows and perspective shadows on
their own separate layers.
Note:
Paint Shop Pro's drop shadow
effect can be accessed under Effects>3D
Effects>Drop Shadows and works
similarly.
|


 |
Add Drop Shadow
Layer Style (in Adobe Photoshop Elements)
To save time
and still achieve a satisfactory uniform
drop shadow, Photoshop and Photoshop
Elements' Drop Shadow Layer Style works
well. If you look at paper pieced pages,
most elements and papers lie very close
to what they are lying above, making
this type of shadow quite acceptable.
It's also great for beginners and those
with little time to fuss. Sample at
right and instructions use Photoshop
Elements 6.
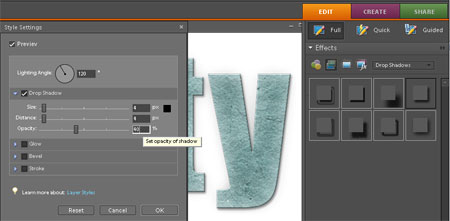
In the
Layer Palette, click on the object
you want shadowed.
In
Effects Palette
(defaults to top right of screen)
select Drop Shadows. Click on
the shadow of your choice. The top right
shadow, Low, is a good place to
start. As you may see at right, it's a
bit too high. So, to customize this shadow, click on the fx on the object's layer in the Layer Palette to
bring up the Style Settings dialog. A
small, realistic shadow is Size: 4,
Distance: 4, Opacity 40. However, you
can set to your preference.
Note: trends are moving towards
larger shadows giving the appearance of
more depth, so you may want to
experiment with sizes. Remember
to decrease opacity as size increases.
|

 |
Add Drop Shadow
Layer Style
(in Adobe Photoshop)
In Photoshop, you can access the
Drop Shadow dialog by selecting
Layer>Layer Style>Drop Shadow.
Follow steps above for adjusting shadow
to your preference. Photoshop offers you
more flexibility in your shadow
settings, but the standard settings
function in the same manner.
The
sample tag at right has the following
settings, lifted a bit as it's hanging
from a string:
Angle:
120, Size: 27, Distance: 16, Opacity: 30 |


see
full layout in our
gallery
|
|
Custom Lifted Drop Shadow
There are
instances when a flat shadow just won't
do the trick, so here are steps to make
your own lifted drop shadow. This works
well for curled papers and mats, as well
as ribbons with folds, etc.
-
Duplicate object's layer
in Layers Panel (Layer>Duplicate
Layer)
-
Change color of lower
layer to black (this is the shadow
layer). Select Enhance>
Adjust Color> Adjust Hue &
Saturation (Ctrl+U; Mac: Cmd+U) and move Lightness
slider all the way left.
-
Blur black layer - I
like between 5-6 pixels on a
300 dpi object. The larger the object
the more blur you need to make the
same effect. Select
Filter> Blur> Gaussian Blur>
Setting> Ok.
-
Click the Move Tool to be able to
transform the shadow layer's shape.
While holding the Ctrl key down
(Mac-Cmd key), grab the lower right
handle of the selection box and drag
shape left and down. Bring top right
side down and right. Click enter to
transform. See Step 4 image for
example.
-
Since my light source is coming from
top left, move the entire shadow
over to the right with the right
arrow key a tad (so no shadow
appears on left edge).
-
Take Smudge Tool to push shadow down
and inward at lower left edge and
upward a bit in middle of the bottom
to get the lifted look.
-
Adjust opacity of
black shadow layer to around 30%.
-
Use
the Dodge and Burn Tools (at about
10% opacity set to Midtones) to
further define the object to look
lifted as shown at right. Burn areas
with less shadow and dodge lifted
areas.
-
Link two layers together so the
shadow stays with the object, or
merge into one layer (select both
layers in layer palette, right click
and choose Merge Layers or Link
Layers).
With Adobe
Photoshop you can use the amazing Warp
tool to perform steps 5 and 6. Select
Edit > Transform > Warp. |
Step 2

Step 4

Step 6

Step 7

see
full layout in our
gallery
.
|
|
Custom 3D Perspective Shadows
Perspective
pages are those in which appear 3D, as
if the paper was a room with a floor and
walls or a shadowbox or shelf as shown
in the layout at right. These creative pieces
take a great deal of time to execute
properly, however, are wonderfully
challenging and stunning to look upon
when done well. The steps for creating
perspective shadows are the same as for
a lifted shadow, except for the
transformation of the shadow shape (step
4 above).
Note: Our
Shadowbox
Scrap.Frames come with a
custom 3D shadow so all you need to do
is add a photo or layout behind it, plus
add your own 3D elements in front on the
shelf, if desired.
Below we
will create a 3D shadow for the branch
lying on the shelf in front of the
shadowbox.
-
Duplicate object's layer
in Layers Panel (Layer> Duplicate
Layer)
-
Change color of lower
layer to black (this is the shadow
layer). Select Adjust Hue &
Saturation (Ctrl+U; Mac: Cmd+U) and move Lightness
slider all the way left.
-
Blur black layer -
For 3D shadows, I
like between 9-11 pixels on a
300 dpi object. The larger the object
the more blur you need to make the
same effect. Select
Filter> Blur> Gaussian Blur> number
of pixels> OK
-
The
light source is coming from top left
as shown on the shadowbox's shadow.
To replicate this on the branch, click the
Move Tool to be able to transform
the shadow layer's shape in the
direction you want the shadow to
fall. While
holding the Ctrl key down (Mac: Cmd
key), grab the top right handle of
the selection box and drag shape
down and right as if lying on the
ground.
-
Adjust opacity of
black layer to around 20-30%.
-
Take
a large soft edge eraser, set it to
10% opacity and erase a touch of the
shadow furthest away. Decrease opacity
to 5% and erase a bit from the center.
The reason for this step is that
shadows become less dense the further
away they are from the object.
-
Something else I like to do is use the
Smudge Tool, to customize the shadow
even more. In this case, to make the
shadow less at the bottom of the
leaves since they are touching the
bottom of the shelf. Select the Smudge
Tool on the Tool Bar, click on the
shadow layer in the Layers Panel. Push
the shadow softly in the direction you
want it to move as in Step 6 above.
-
Link
two layers together so the shadow
stays with the object, or merge into
one layer (select both layers in layer
palette, right click and choose Merge
Layers or Link Layers).
-
Repeat for glass bottle and flower.
-
Save
layout as a layered .PSD image in
order to edit in the future.
-
To
share on the Internet, flatten, resize
to 600 pixels wide, and about 7-8
quality .JPG.
Want more 3D
Perspective layout inspiration and
technique how-tos, like the prom
layouts below right? See our blog
here,
here,
here,
and
here!
Happy
Creating!
Michelle Shefveland and Team |

Step 3

Step 4

Step 5

Step
7

 |
 |
|
melinda ver
meer |
michelle
shefveland |
|
|
 |
|
